 1
1


Banner Image Courtesy of 3DSPRO
Why 3D Printing Supports?
3D printers build parts layer by layer, so any 3D printing material laid in mid-air needs something underneath to hold it up. Support structures are sacrificial scaffolds that prop up overhanging or bridging sections of a model during printing. For example, imagine printing the letter “T” standing up: without supports, the horizontal arms have nothing to rest on and will collapse under their own weight. In general, any overhang tilted more than about 45° from vertical needs support, because beyond this angle, each new layer has little to cling to. Similarly, long bridges (usually over ~10 mm) tend to sag if not supported.
In short, supports are essential for maintaining part geometry when the model’s shape creates unsupported spans or overhangs. Without them, features will droop, deform, or fail to print correctly.
Supports are used across many 3D printing technologies. In filament (FDM) printing, supports prevent the plastic from sagging during long overhangs. In resin (SLA/DLP) printing, supports hold the model so it doesn’t float in the vat – these typically look like thin ribbed pillars with small contact tips to minimize marks. Even in powder-based methods like SLS or binder jetting, the surrounding powder itself acts as a support (so no extra supports are printed). Overall, adding supports lets you print complex geometries without collapse, at the cost of extra material and cleanup.
Types of 3D Printing Supports
There are several styles of support structures.
In FDM printing, the two main types are lattice (grid) supports and tree supports. Lattice supports form a regular grid or pillars directly under the overhang. They are strong and reliable, but use more material and often leave support marks on the part.
Tree supports, by contrast, branch out like mini trees, touching the model only at a few thin tips, which uses significantly less material and usually makes cleanup easier, since there are fewer contact points. For example, Cura’s “tree support” option generates angled branches that wrap around the print and meet it only at tiny points.
Standard FDM supports are usually break-away (printed from the same plastic as the model) and are snapped off by hand or cut away. Many dual-extruder printers can print supports with a dissolvable material like PVA (water-soluble) or HIPS (soluble in d-limonene). These soluble supports give the cleanest results, since you can wash them away in water or solvent, avoiding mechanical removal altogether.
Other 3D printing processes have their own support styles:
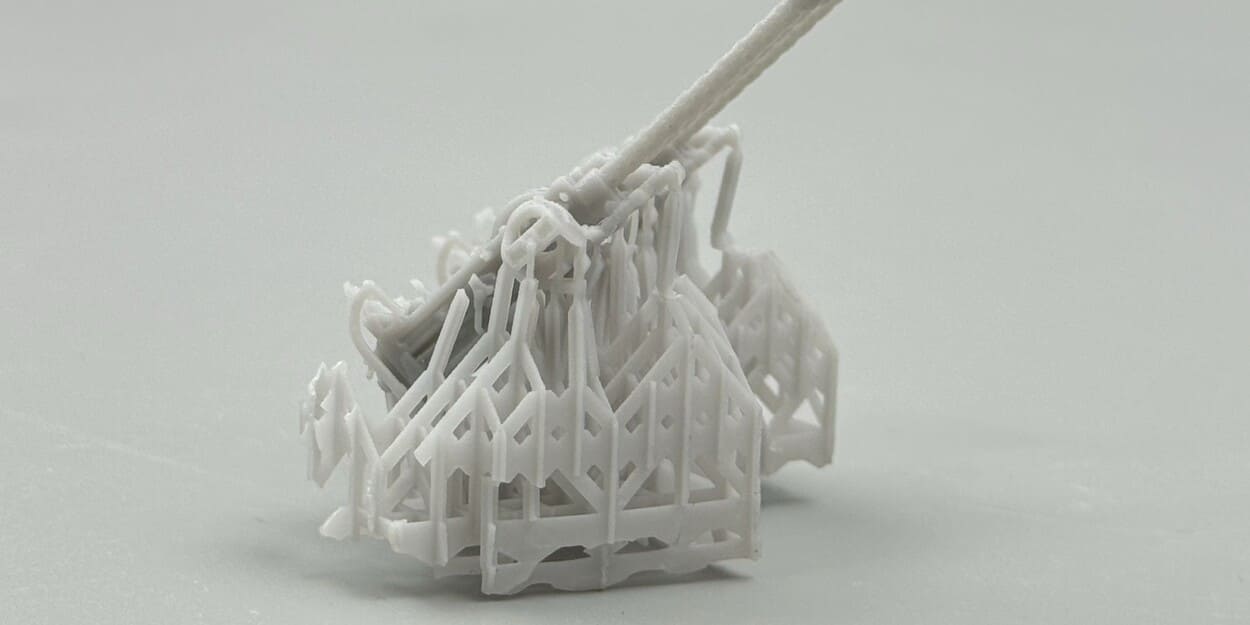
In SLA/DLP resin printing, supports are thin-walled “ribs” or spikes that touch only small points on the model. They are nearly always required to keep the print anchored, but are designed to be as minimal as possible.
In SLS or Multi Jet Fusion, the unfused powder naturally holds up every feature, so no extra support structures are printed.
For metal 3D printing, supports are used to fix the part and manage heat during sintering; in that case, supports can often be printed up to steep angles (~35°) without collapse, but still need to be easy to remove.
How to Design Effective Supports?
Good support design starts with your model geometry and orientation. Try to orient the model so that overhangs are minimized.
For example, put the largest flat face on the build plate or rotate the model so gentle slopes face upwards. You can also add fillets or chamfers (angled edges) to reduce abrupt 90° overhangs. If your model has very long horizontal bridges or large unsupported areas, it’s better to split it into pieces or add temporary pillars in the design. In general, any overhang >45° or bridge >10 mm is a flag that you’ll likely need supports.
In the slicer software, you can let the program auto-generate supports or place them manually. Automatic supports will fill in underneath all overhangs beyond a user-set angle. Manual tools let you add custom support blocks exactly where needed (and block supports elsewhere). After generating supports, review the preview – most slicers will highlight overhangs so you can tweak placement.
Tune the support settings for your print:
Density/Infill: Lower densities make supports easier to remove. A common benchmark is 10–20% infill for most prints. You can bump this up (to ~25–30%) for very heavy or long overhangs if needed.
Support Type: Use lattice/grid for flat, heavy overhangs, and tree supports for organic or sparse overhangs. Tree supports use less plastic and often break off more cleanly.
Support Contact/Z-Gap: The vertical gap (Z distance) between the top of the support and the model lets the model “float” above the support by a small amount. A typical gap is about one layer height. A larger gap makes removal easier but risks slight drooping; a smaller gap (or interface layer) makes a sturdier support contact. Tweak this so that supports touch the model firmly but can still be pried off.
Pattern: Some slicers let you choose the support pattern (grid, zigzag, lines). Experiment – denser patterns hold better but use more material.
Finally, use support blockers or custom supports to avoid wasting supports in tricky areas. For instance, if a delicate detail doesn’t really need support (because it’s small and can bridge on its own), place a blocker over it. Conversely, add extra supports under any critical overhangs. The goal is to use just enough support to prevent failure, not to blanket the model in scaffolding. Designing supports is part of good 3D printing practice, so iterate and test – even moving a part slightly can greatly reduce the supports needed.
Support Removal & Post Processing
After printing, remove supports carefully so you don’t damage the model.
1. Start by breaking or cutting off the easy supports first: use needle-nose pliers or flush cutters to grab a support near its base and twist or snip it off.
2. Work from the outside in. For small or internal supports, use long-nose pliers and an X-Acto or hobby knife to reach into tight spots. Always move slowly and gently – it’s easy to gouge the part if you rush it.
3. Once the bulky supports are gone, refine the surface. Use a craft knife or small file to trim any remaining nubs.
4. Then sand the contact points: start with medium grit to remove bumps, then finer grit to smooth the finish. Be careful not to sand too deeply. For PLA or ABS parts, you can also use a bit of heat (like a lighter or heat gun) to slightly melt the bump before flattening it with a tool, but do this sparingly.
5. If you used soluble supports (PVA or HIPS), simply submerge the print in water (or the appropriate solvent) after printing. The supports will dissolve, leaving just the mode, which is often the easiest cleanup for complex prints.
For resin prints, the process is similar: after the print is rinsed in isopropyl alcohol, you can break off the supports (often with pliers) before the final curing step. Then cure the part under UV and sand any remaining scars on the surface. SLS/ MJF 3D prints require no support removal – instead, you must brush or air-blast off the loose powder, followed by any chosen finishing (sandblasting, polishing, etc.).
FAQs
Q: Do I always need supports?
A: Not always. As a rule of thumb, features tilted less than ~45° from vertical typically print fine without support. Short bridges (usually under 10 mm) often print without major sagging as well.
Q: What happens if I don’t use supports on overhangs?
A: Parts without support tend to droop, leaving sagging strands or blobs.
Q: Can supports damage my print?
A: Yes, supports can leave marks or scars where they touch the model. That’s why we design them to have small contact points.
Q: How can I reduce the amount of support needed?
A: Optimize your design and orientation. Rotate the model to put large flat surfaces down or to reduce overhang angles. Add chamfers or small slopes to edges so they don’t jut out at 90°. You can also split very overhung parts into separate pieces and glue them after.


