 2
2


Banner Image Courtesy of Formlabs
The surface finish of 3D printed resin plays a huge role in the final look and feel of your parts. Whether you’re creating miniatures, functional prototypes, or intricate jewelry, knowing how to refine resin 3D prints can take your projects from good to showroom‑ready.
How SLA/DLP Processes Affect Surface Texture
SLA (Stereolithography) and DLP (Digital Light Processing) both cure liquid resin layer by layer using UV light. However, slight differences in light source, pixel size, and layer height will determine the as‑printed surface:
Layer Lines & Pixelation: Typical layer heights (25–100 µm) leave visible ridges. Smaller layers = finer detail, but longer print times.
Resin Viscosity & Flow: Thicker resins can trap micro‑bubbles; thinner resins may flood easily, creating smoother planes.
Image Courtesy of Hi3DP
Common Surface Artifacts of Resin 3D Prints
1. Layer Lines: Horizontal striations where each cured layer meets.
2. Support Scars: Rough spots where supports attach; can vary with support density.
3. Peel Lines: Vertical streaks from the build plate peel cycle.
4. Micro‑Bubbles: Tiny pinholes from trapped air during vat curing.
5. Over‑cured Edges: Slight bulging where UV light bleeding occurs.
By identifying these artifacts in your resin 3D prints, you can choose the right finishing strategy and avoid oversanding or other mistakes.
Pre Finishing Steps: Cleaning & Curing
Isopropyl Alcohol Wash
Why: Removes uncured resin and oils that prevent adhesion of primers and paints.
How: Submerge resin 3D prints in 90%+ IPA for 2–5 minutes, gently agitate, then let drip‑dry.
UV Post‑Cure
Why: Fully cures internal resin chains for strength and dimensional stability.
How: Use a UV curing station or sunlight for 10–20 minutes per side. Rotate parts for even curing.
Sanding and Polishing
Sanding Progression
1. Start Coarse: 200–400 grit to remove layer lines and support marks.
2. Medium: 600–800 grit to smooth transitions.
3. Fine: 1000–2000 grit for a near‑polished surface.
Use wet sanding whenever possible to minimize dust and clogging. Hold the part at multiple angles to ensure catching all ridges.
Polishing Compounds & Buffing
After sanding:
Apply a small dab of plastic‑safe polishing compound.
Use a soft cloth or rotary buffing wheel on low speed.
Buff in circular motions until you achieve the desired sheen.
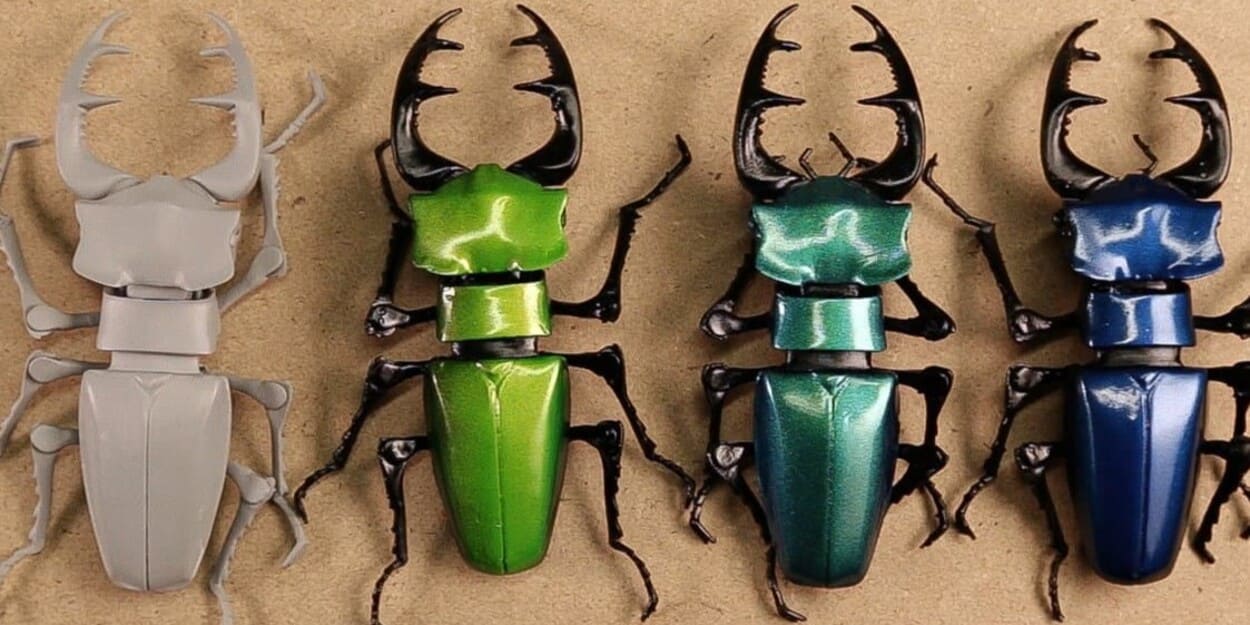
Hi3DP's approved suppliers will eliminate visible layer lines and create a silky‑smooth base ready for coating by carefully sanding and polishing SLA 3D printed resin parts.

Image Courtesy of Hi3DP
Coating and Painting
Primers & Fillers
Filler Primer: Thicker than standard primer; it fills minute scratches and pinholes.
Sandable Primer: After application, lightly sand with 800–1000 grit to perfect the surface.
Paint Selection
Acrylic Spray Paint: Fast‑drying, water‑based, and user‑friendly for hobbyists.
Automotive Lacquer: Ultra‑smooth, durable finish for high‑quality models.
Clear Coats
Gloss: Highlights details, ideal for sleek, shiny parts.
Matte: Hides minor imperfections and gives a professional model‑like appearance.
Electroplating
Electroplating adds a real metal finish to your resin 3D prints, perfect for jewelry or decorative parts.
1. Conductive Base Coat: Brush on a conductive paint (graphite or copper).
2. Electrolyte Bath: Immerse in a metal salt solution (e.g., copper sulfate).
3. Current Application: Use a low‑voltage power supply (1–3 V) to deposit a metal layer.
4. Polish & Seal: After plating, lightly polish and apply a clear sealant to prevent tarnish.
While more advanced, electroplating resin can yield stunning, real‑metal surfaces—just make sure your part is fully conductive and safety protocols are in place.

Image Courtesy of Prusa Research
Threading and Tapping
For functional parts requiring screws or fasteners:
Heat‑Set Inserts: Use a soldering iron to press brass inserts into pre‑drilled holes. Provides durable threads in resin.
Tapping Resin: For small volumes, choose self‑tapping screws sized to the hole diameter (e.g., M2–M3). Tap gently to avoid cracking.
Embedding hardware during the print (pause and drop in nuts) is another resin‑specific trick to achieve strong, precise threads.
FAQs
Q: Which resin types are easiest to finish smoothly?
A: Standard or “model” resins with lower viscosities and fine pigment loads tend to sand and polish more uniformly than heavily filled or specialty composites.
Q: How can I prevent yellowing or discoloration over time?
A: Store finished resin parts out of direct sunlight and apply a UV‑resistant clear coat.
Q: Can I paint directly on resin without primer?
A: You can, but primer greatly improves paint adhesion, hides sanding marks, and gives a more uniform base for color.


